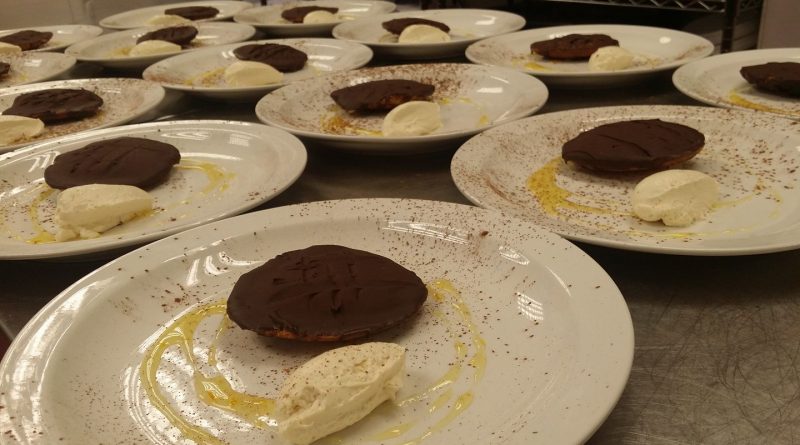
Homemade jaffa cakes
I have always loved jaffa cakes, however, I’ve since found out that some people just aren’t fans of the smashing jaffa orangey bit!
I know, right?
Anyway, I took to making a jaffa cake without jelly and here’s what I came up with. They still have a smashing jaffa orangey bit, although this time around it is a creamy orange curd, giving a lovely moist cake with a soft chocolate topping. Any left over curd can be easily repurposed for use in another item, such as tarts.
I tend to make the bases and filling alongside each other, however, the curd can just as easily be made beforehand and piped on even if chilled, i just find that when done slightly warm it absorbs into the sponge slightly better and gives a nicer cake with a smoother set filling.
Size wise, it really is up to you. Smaller ones could be used as dainty little treats, whereas you could just as easily make indulgently large frisbees. There’s no reason the recipe cant be adapted and just make one in a cake tin to serve sliced, however I do like the fact that these are reminiscent of the jaffa cakes we grew up with.
Homemade jaffa cakes
Ingredients
cake base
- 100 g flour self raising, or add baking powder
- 100 g butter
- 100 g caster sugar
- 2 chicken's bum eggs
filling
- 125 g sugar for eggs
- 75 g sugar for juice
- 150 ml orange juice
- 2 oranges worth of orange zest
- 2 chicken's bum eggs
- 200 g unsalted butter
soft chocolate topping
- 2 dark chocolate
- 1 double cream
optional syrup
- orange juice
- orange zest
- sugar
Instructions
cake base
-
Make as for victoria sponge. Add slightly more flour and / or chill slightly in bag to tighten and hold piped shape for longer until set in oven
-
Cut piping bag to about 20mm (or use nozzle) and pipe discs onto silicon paper or baking sheet on a baking tray leaving a gap of around 40-50mm in between for them to expand. make sure they are piped quite thickly with high edges to give a rounded appearance when cooked. size wise, it really is up to you. I find 50-60mm gives a decent single serving portion once risen and spread out slightly.
-
Bang in a hot oven... until done. They're quite thin, so once lightly browned they should be there. Knife check if unsure. Don't overcook or the edges will crisp up which you don't really want, but won't hurt if it happens.
-
Once cooled slightly, with a pallet knife, fish slice, egg thingy or whatever you have and call it, transfer each to a cooling rack turning them over to flat side up as you do so. Baking tray should be on a baking tray to catch overrun topping, use the one you just baked with if not needed for further batches.
-
Set aside to cool slightly while you finish off the filling, unless you made it while baking.
filling
-
Orange curd. Method and amounts to follow...
-
Basically done in 2 stages and then combine.
-
Beat sugar and eggs until fluffy
-
bring juice, sugar and zest to boil in a thick bottomed pan
-
slow down mixer and slowly pour juice mix into beaten eggs.
-
Put the whole lot back into pan. Return to low heat and cook out until thickened, stirring constantly with rubber or silicon spatula. Take care to keep the entire batch moving, scraping the edges and and bottom so it doesn't catch and cooks out smoothly. Usually takes around 2-3 minutes, don't walk away from this bit or you'll end up with orangey scrambled eggs.
-
Once thickened, take off the heat and add the cubed butter, stirring until it has all been combined with the orange mix. Set aside to cool slightly.
-
The filling can be added in 2 stages while still warm. The first stage will be largely absorbed by the sponge, the 2nd will set on top. Pour a little of the curd onto the middle of each cake. Transfer the whole tray to a fridge to begin setting the curd. This is when you have your coffee.
-
After 10 minutes or so, sufficient skin will have formed on top to allow for a second coating which will sit more proud of the sponge. chill again after the second coat while you make the ganache for the topping.
Soft chocolate topping
-
Make ganache
optional cream
-
Whip, don't make butter...
optional syrup
-
boil syrup ingredients until "just right" ha ha...
[fblike]